With social distancing being an essential need for the foreseeable future, we're all turning to video conferencing services to not only stay in touch with friends and family, but also to connect with people working at our events - from suppliers to crew members.
There are loads of different platforms that you can use to get your video conference up and running so it can be confusing deciding on which product will best suit your needs. If video conferencing is new to you and you need to have a meeting remotely, brief your team on projects, or host a presentation - Zoom is a popular option for engaging, interactive sessions.
Here's what you need to know to get started.
The first thing you need to do is sign up for a Zoom account and ensure that you have the Zoom software installed on your computer, including the mobile application if you're using a tablet or phone on the go. To get started, visit Zoom and create an account - you can select the plan that best suits your needs.
Quick tip: Basic accounts allow free one to one meetings, and meetings with additional participants with a duration of up to 45 minutes. If you require longer meetings, you can upgrade your account to Pro.
Think about where a virtual a meeting could replace in-person meetings. Perhaps you can replace in-person planning with online sessions, or on-site briefings with remote briefings. Zoom has the option to choose between scheduling a meeting or webinar. The meeting and webinar platforms are similar in features and functionality, but have some key differences depending on your goal.
Meetings are designed to be collaborative where all participants are in the same room, and can screen share, turn video and audio on/off, and see everyone else in attendance. These are great for when you want to catch-up with your colleagues for a morning stand-up meeting, or to brief your team on a new project. There are also some great capabilities like breakout rooms to help you better replicate in person interactions.
Webinars are designed so that the host and panelists can share their video, audio and screen, however attendees are view-only. Attendees will be able to interact via features like Q&A, chat and poll. Situations where you'll want to run a webinar are panel discussions, presentations, talk shows or virtual events etc.
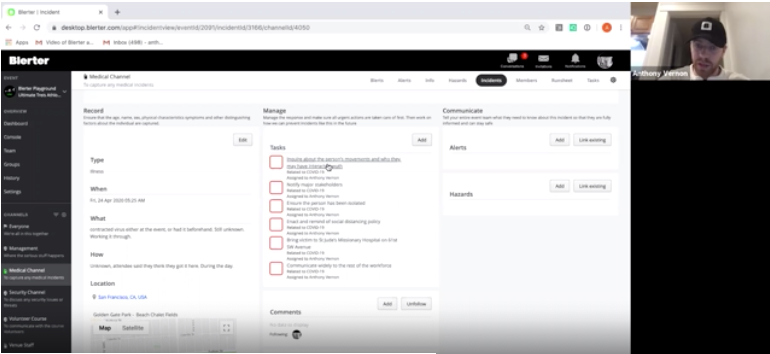
Example of a meeting:.png?width=3360&name=image%20(1).png)
Example of a webinar:
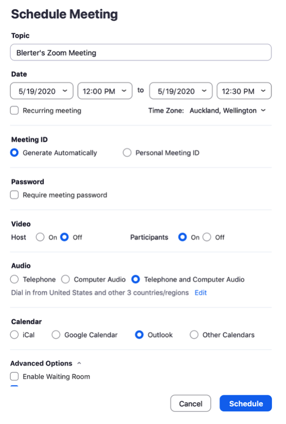
Once you've got the software installed, open up the app and sign in. Click the Schedule button - a pop-up screen will appear and this is where you will enter the details of your meeting.

Here you can select your video and audio preferences.
We've heard all the horror stories and embarrassing moments of video conferencing going wrong. You don't want to be that guy appearing in your robe (...or underwear) on video in front of all your colleagues, or worse... your boss! We won't go into further details on embarrassing moments, but it might interest you to check out this blog post on the Do's and Dont's of Online Video Meetings.
Video - select whether you want to enable both Host and Participants to have their video on upon joining a meeting.
Audio - select whether you want to enable telephone and computer audio on upon joining a meeting.
Select the Calendar type you wish to create the invitation with. This will depend on how you manage your calendar - if you're using the Calendar app on a Mac select iCal, for Outlook select Outlook, and if you're using G-Suite then Google Calendar is the option you'll need.
Waiting room - with the advanced options, you can choose whether you'd like to enable a waiting room. The Waiting Room feature allows you to control when a participant joins the meeting. You can meet with one person (alternative host or panelist) while another waits in the waiting room and then allow the person waiting to join the meeting.
Alternative hosts - enter the email address of the contact you'd like to join the meeting as an alternative host. As an alternative host, they will be able to start the meeting on the host's (yourself) behalf. The user will receive an email notifying them that they've been added as an alternative host, with a link to start the meeting.
Recording - with this function you can automatically record meeting in the cloud. If you wish to record meetings or training sessions so you can refer back to it in the future, check the box.
Breakout rooms - breakout rooms are an interesting feature you might want to explore. This allows you to split your Zoom meetings in up to 50 separate sessions. You can choose to split the participants of the meeting into the separate sessions, and switch between at any time. Simply enable this feature under your account settings.
When you've completed all the necessary fields, click the Schedule button.
Click on Meetings at the top of the menu bar. Select the meeting you have just created and click Copy Invitation, then paste the information to where you desire in order to invite other participants to join your meeting.
On the day of your meeting, you (or the alternative host) will need to start the meeting before your participants are able to join unless you enable "join before host" during setup.
Quick tip: you can change the Zoom background wallpaper! Super handy if you want to hide the mess behind you. Hit the profile icon on the top-right of the window, click Settings and then Virtual Background and select any background already available or upload your own artwork from your computer.
Share screen - while you're on the call, you're able to share a presentation by clicking on the Share Screen button.
Mute / stop video - at any time, you can mute your microphone and stop your video. We actually encourage muting your microphone when you're not speaking, as background noise will be picked up and can be distracting for everyone else. You can then unmute when it is your turn to speak.
Zoom allows you to broadcast a meeting to up to 10,000 view-only attendees, depending on your plan and the size of your webinar license.
You can set up your webinar to require pre-registration, with additional custom registration questions. When you create your webinar without required-registration, your attendees can join on the day by simply clicking on the connection link.
When scheduling your webinar, log into your account via the Zoom website and click on Webinars and then Schedule a Webinar. Fill in the required fields with your desired webinar settings.
Zoom Webinar has some additional features available that regular Meetings do not offer:
Chat - the chat feature is useful if you want to share a file or important message to your participants.
Polling - fancy running a poll? this is a great way to get everyone involved and engage with your participants by getting their feedback or view on something.
Enable practice session - this feature is super handy if you'd like to start the webinar in a practice session rather than live broadcast straight away. With the practice session, you, co-hosts and panelists can run a quick tech-check beforehand, before you go live. Check this option if you wish to have this feature.
Once you have your settings in place, click Schedule and your webinar is ready to go. To invite attendees to your webinar. Under Invite Attendees, you can copy the join link or the invitation to share with your attendees.
And that's it! You're now ready to host a Zoom meeting like a pro.
Disclaimer: This information is intended purely as guidance only. For any support, please visit Zoom Help Center.
Streamline your delivery, be prepared for things that can go wrong and increase crew engagement at your next event.